|
|
There are two kinds of files on this
CD:
One ends in "exe" (anyfile.EXE)
and the other ends in "zip" (anyfile.ZIP).
If a file you choose ends in "exe" load
or copy the file to the temp folder on the hard drive and install it as
is.
If a file ends in "zip" you must use
WinZip to uncompress (open) the file before you install it.
Installing Software
Place Computer Buddies Software CD into CD-Rom
Using the "All Software" page in the
Orientation and Training section or one of the "Software" pages
in the "Software" section of the web site choose the software
you want to download from the CD.
These instructions assume you going to choose the
software from the cd and are downloading it to the temp folder.
|
|
|
|
|
THESE INSTRUCTIONS ARE FOR USING THE
CD:
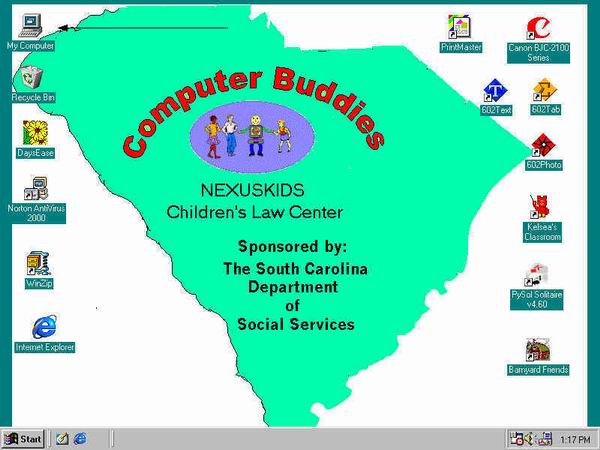
Double Click on "My Computer" |
|
|
|
|
 |
|
|
|
|
|
|
|
|
|
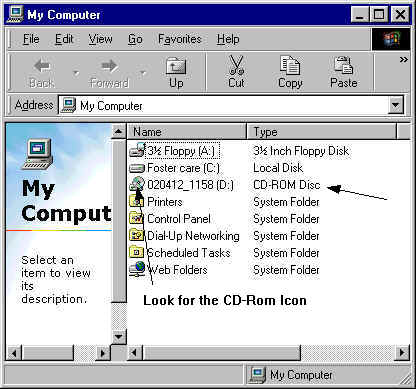
Double Click on CD-Rom Drive (either D
or E) |
|
|
|
|
 |
|
|
|
|
|
|
|
|
|
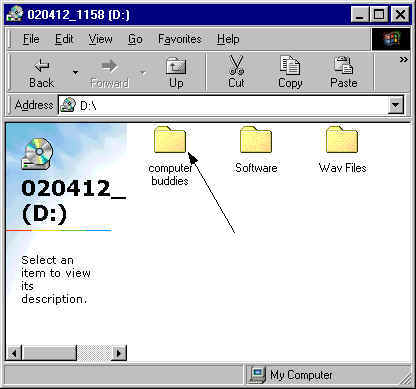
Double Click on Computer Buddies |
|
|
|
|
 |
|
|
|
|
|
|
|
|
|
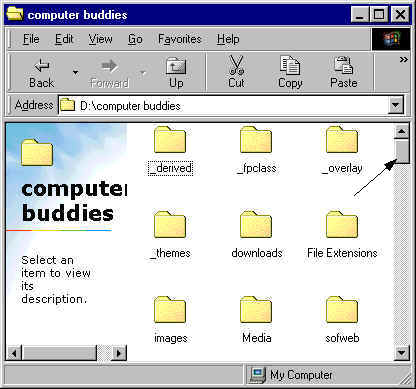
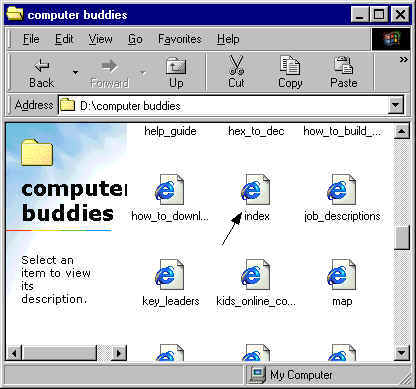
This is what you will see when the folder opens. Slide
the right hand slider bar down to find index. Note: The files you
see in yellow on the screen are file folders (also called sub-directories)
these contain files. The files you need are below the folders.
Move the slider bar down to find the files. |
|
|
|
|
 |
|
|
|
|
|
|
|
|
|
Find the INDEX file by using scroll
bar. (Files are in alphabetical order). Double Click on Index |
|
|
|
|
 |
|
|
|
|
|
|
|
|
|
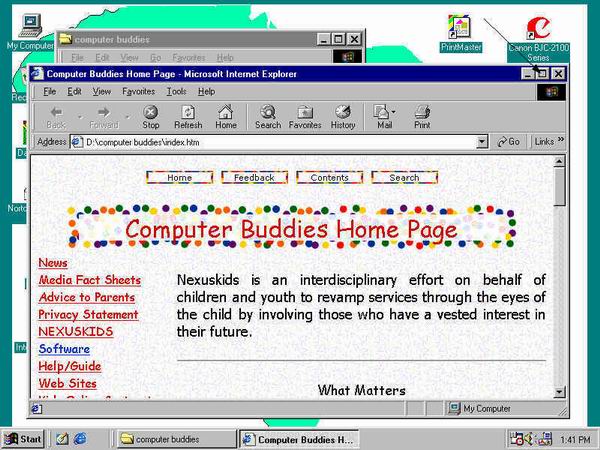
Computer Buddies Homepage should
appear. Click on middle box in right hand corner to maximize the
screen. |
|
|
|
|
 |
|
|
|
|
|
|
|
|
|
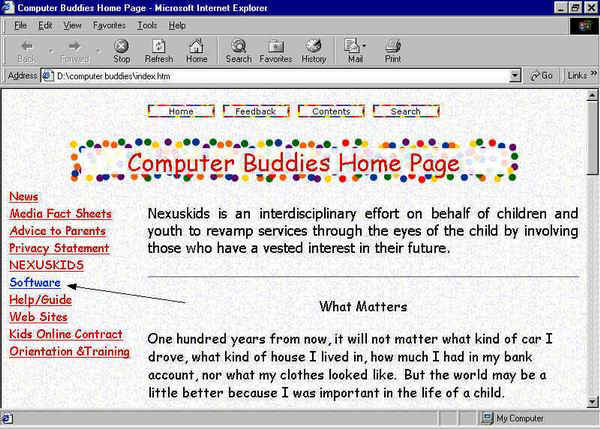
Double Click on Software |
|
|
|
|
 |
|
|
|
|
|
|
|
|
|
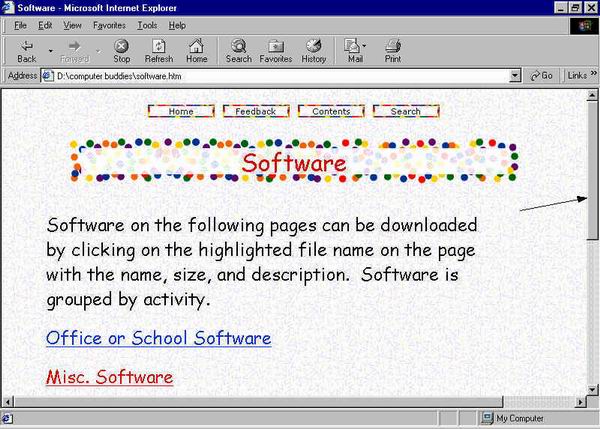
Use Right slider bar to see all 5
software groups ( Office or School Software, Misc. Software, Children's
Software, Utilities Software, and Games ) |
|
|
|
|
 |
|
|
|
|
|
|
|
|
|
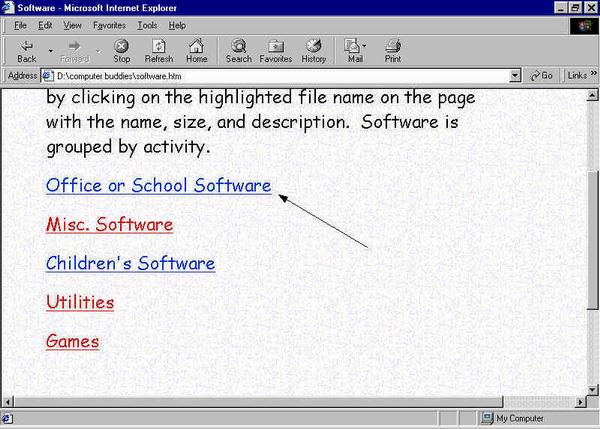
Single Click on the Software group
that contains the software you are looking for or click on the Software
group you wish to browse. For this example we are going to click on
Office or School Software |
|
|
|
|
 |
|
|
|
|
|
|
|
|
|
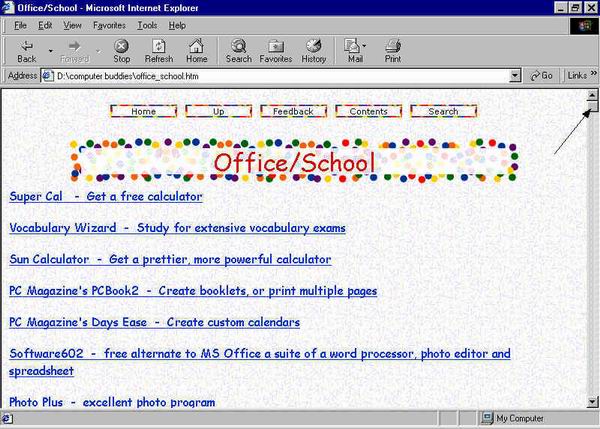
When you click on Office or School it will show the upper
part of that page.
Use the slider bar on the right to see all of the software. There
are short descriptions on top. |
|
|
|
|
 |
|
|
|
|
|
|
|
|
|
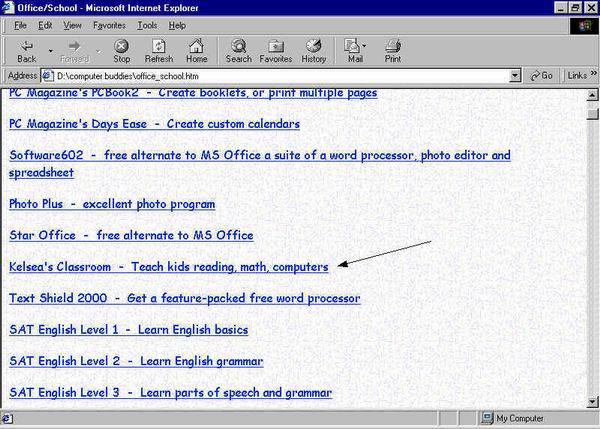
It will show you a brief description
of the software. When you find one you would like to download.
Single Click on Software you want. For this example we are going to
choose Kelsea's Classroom. |
|
|
|
|
 |
|
|
|
|
|
|
|
|
|
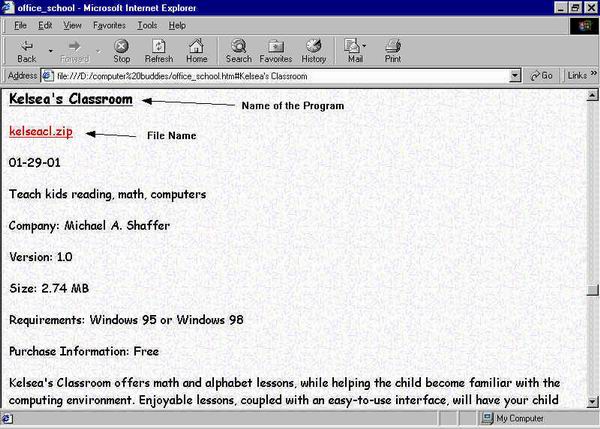
Bold letters denote the name of the
program. The name in Red
will be the filename. Double Click on the Red filename. |
|
|
|
|
 |
|
|
|
|
|
|
|
|
|
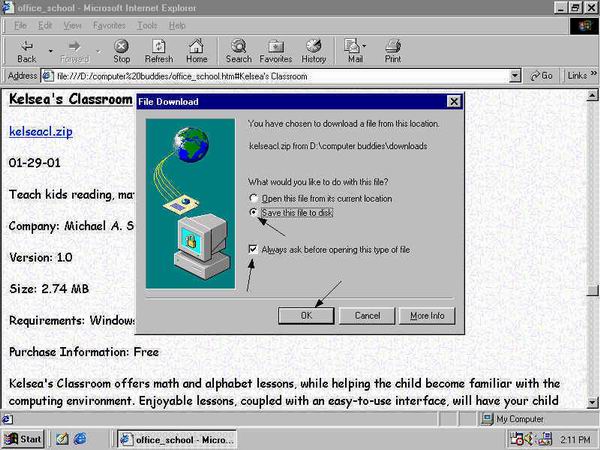
This will bring up the Download
window box. In File download window, make sure that the "Save
this file to disk" prompt and "Always ask before opening this
type of file " are both selected.
Then click OK |
|
|
|
|
 |
|
|
|
|
|
|
|
|
|
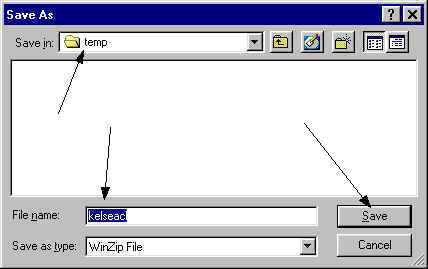
This brings up the Save As
Window. In Save in window you should see "temp", the file
name (in this example kelsea) and WinZip for "Save as
Type" If correct click Save. |
|
|
|
|
 |
|
|
|
|
|
|
|
|
|
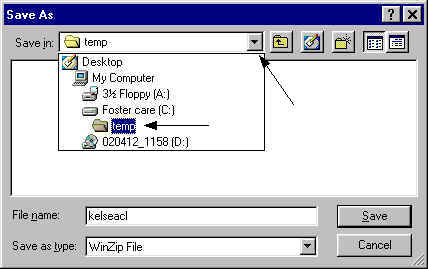
(if not press the down arrow.
Select the c: drive and then temp) |
|
|
|
|
 |
|
|
|
|
|
|
|
|
|
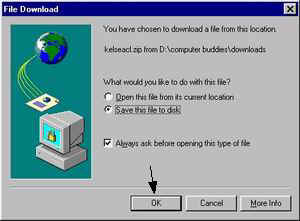
File Download box should appear. Click OK
|
|
|
|
|
 |
|
|
|
|
|
|
|
|
|
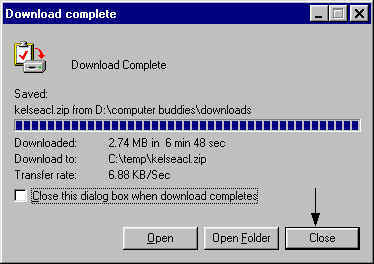
When download is complete, Click close
|
|
|
|
|
 |
|
|
|
|
|
|
|
|
|
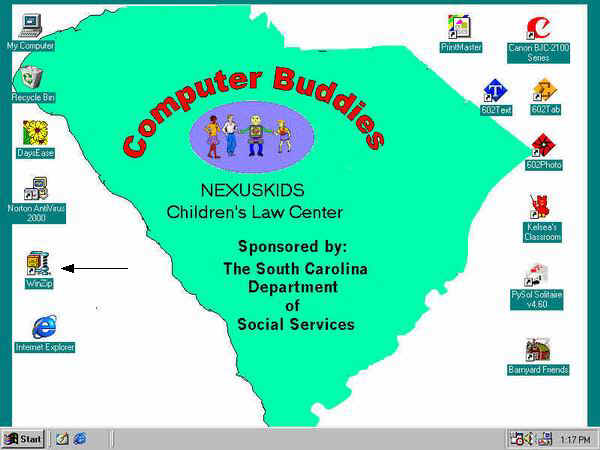
Close the windows you have open.
You should be at the
main computer buddies desk top. Double Click on WinZip Icon
|
|
|
|
|
 |
|
|
|
|
|
|
|
|
|
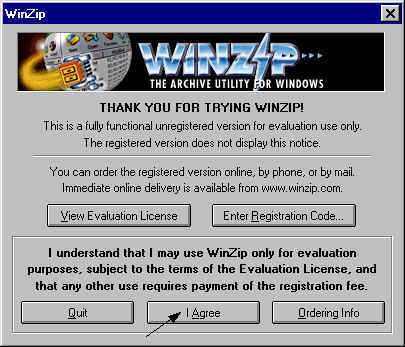
When WinZip Thank You Screen appears, Click on "I
agree"
|
|
|
|
|
 |
|
|
|
|
|
|
|
|
|
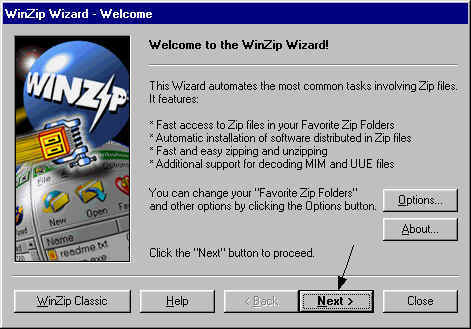
WinZip Welcome screen appears. Click Next
|
|
|
|
|
 |
|
|
|
|
|
|
|
|
|
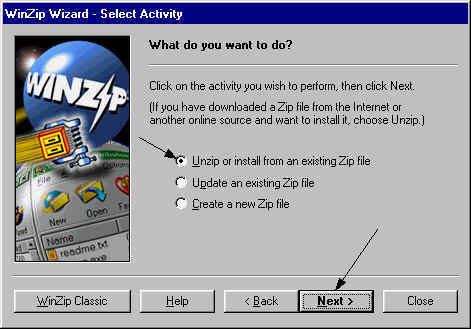
WinZip Select Activity appears, click next. Click on "Unzip or install from existing zip,
click Next
|
|
|
|
|
 |
|
|
|
|
|
|
|
|
|
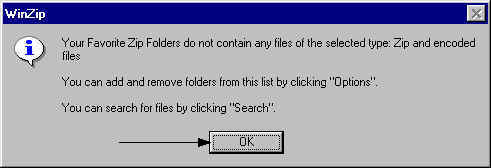
WinZip box appears. Click OK
|
|
|
|
|
 |
|
|
|
|
|
|
|
|
|
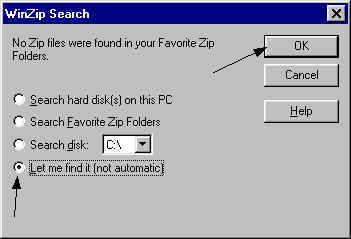
WinZip Search box appears. Click on "Let me find it".
Click OK
|
|
|
|
|
 |
|
|
|
|
|
|
|
|
|
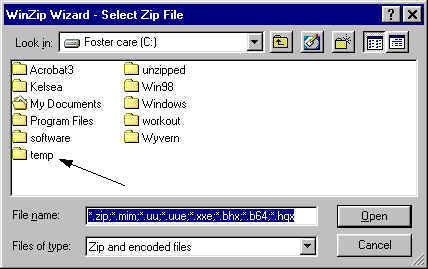
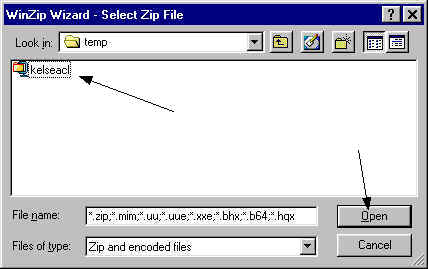
WinZip Wiz select zip file window will open.
Double click on the Temp folder.
|
|
|
|
|
 |
|
|
|
|
|
|
|
|
|
Click on Kelseacl. Then click
on open.
|
|
|
|
|
 |
|
|
|
|
|
|
|
|
|
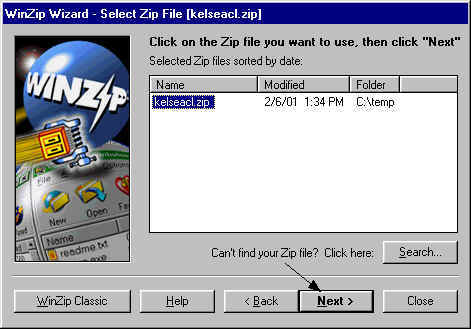
Click Next
|
|
|
|
|
 |
|
|
|
|
|
|
|
|
|
At "Add to favorite zip folder" Click No
|
|
|
|
|
 |
|
|
|
|
|
|
|
|
|
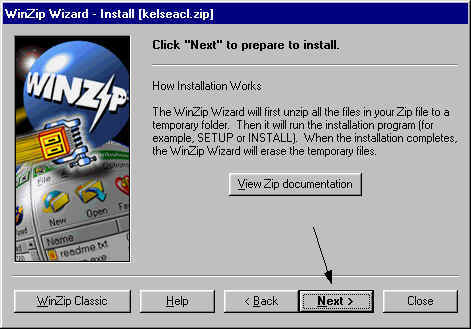
Click Next
|
|
|
|
|
 |
|
|
|
|
|
|
|
|
|
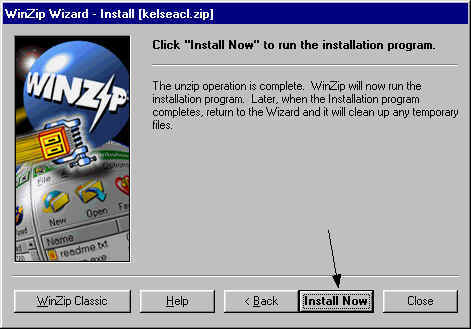
Install now setup window appears, Click
on "Install Now"
|
|
|
|
|
 |
|
|
|
|
|
|
|
|
|
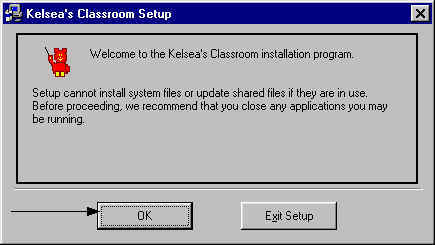
License info should appear.
Click on OK
|
|
|
|
|
 |
|
|
|
|
|
|
|
|
|
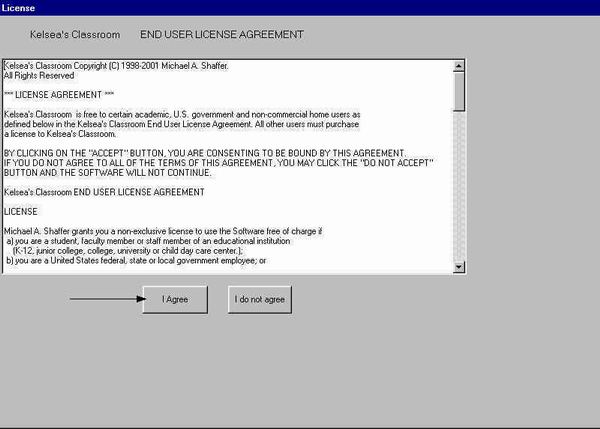
Click "I agree"
|
|
|
|
|
 |
|
|
|
|
|
|
|
|
|
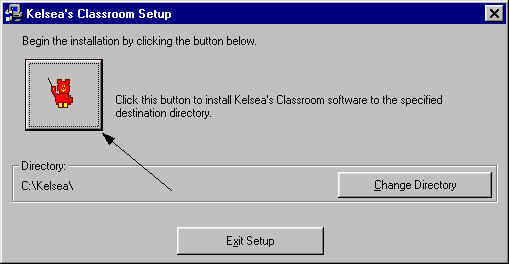
Click on program icon to begin installing the program.
|
|
|
|
|
 |
|
|
|
|
|
|
|
|
|
When you are finished with the install close all windows
still open. The program you are installing should be on the
desktop. If the program did not create a desktop icon you can still
access it by clicking on Start then Programs, and then the name of the
program you have just installed. |
|
|
|
|
|
|
|